Adding & Customizing Text
Adding Text
Click the Add Text tab in the design studio. Enter your text in the field and click the Add To Design button.
Customizing Text
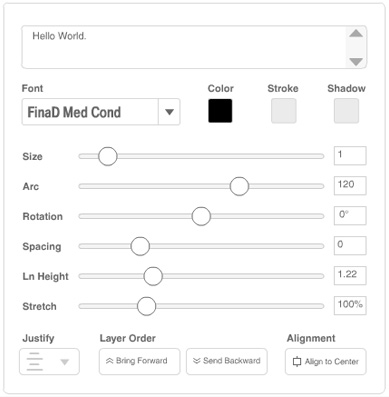
Once you have added text to your design, you can easily manipulate its font, color, size, arc, letter spacing, position and orientation. To alter text on your design, begin by clicking the text to select it. Then from the Edit Text tool panel you can alter the text object's:

- Color
-
Click the color block to open the color palette. Next, change the text color by clicking on an ink. When you are done, click the close button when you're done.
- Size
-
Click the text to select it. Resize the text by clicking and dragging the square nodes that appear at the corner of the text object. You may also change the font size by dragging the size slider.
- Curve
-
Text can be arced or curved by specifying a value from -360 to 360 in the Arc field or by dragging the arc slider. The arc value is in degrees with a value of 0 for flat text and 360 for a full circle. Positive values create a downward curve while negative values curve the text upwards.
- Letter Spacing
-
The spacing between letters (or tracking) can be increased or decreased by adjusting the spacing slider.
- Justification
-
You can left, center, or right align multiple lines of text by clicking the appropriate justification button. Note that curved text can only be center-justified.
- Rotation
-
Click the text object to select it. Click and drag the 'R' handle on the side of the text box to rotate the text object. You can also use the rotation slider in the Edit Text panel.
- Layer Order
-
The layer order determines how text and image objects overlap. By increasing or decreasing a text object's layer order, you can move it above or below other objects in your design.
Deleting Text
To delete a text object from your design, first select the text object by clicking on it. Next, click the red 'X' that appears next to the text object.


